246 lines
5.8 KiB
Markdown
246 lines
5.8 KiB
Markdown

|
|
|
|
# wireguard-ui
|
|
|
|
A web user interface to manage your WireGuard setup.
|
|
|
|
## Features
|
|
- Friendly UI
|
|
- Authentication
|
|
- Manage extra client's information (name, email, etc)
|
|
- Retrieve configs using QR code / file
|
|
|
|
## Run WireGuard-UI
|
|
|
|
Default username and password are `admin`.
|
|
|
|
### Using docker compose
|
|
|
|
You can take a look at this example of [docker-compose.yml](https://github.com/ngoduykhanh/wireguard-ui/blob/master/docker-compose.yaml). Please adjust volume mount points to work with your setup. Then run it like below:
|
|
|
|
```
|
|
docker-compose up
|
|
```
|
|
|
|
Note:
|
|
|
|
There is a Status option that needs docker to be able to access the network of the host in order to read the
|
|
wireguard interface stats. See the `cap_add` and `network_mode` options on the docker-compose.yaml
|
|
|
|
|
|
### Environment Variables
|
|
|
|
|
|
Set the `SESSION_SECRET` environment variable to a random value.
|
|
|
|
In order to send the wireguard configuration to clients via email, set the following environment variables:
|
|
|
|
- using SendGrid API
|
|
|
|
```
|
|
SENDGRID_API_KEY: Your sendgrid api key
|
|
EMAIL_FROM_ADDRESS: the email address you registered on sendgrid
|
|
EMAIL_FROM_NAME: the sender's email address
|
|
```
|
|
|
|
- using SMTP
|
|
|
|
```
|
|
SMTP_HOSTNAME
|
|
SMTP_PORT
|
|
SMTP_USERNAME
|
|
SMTP_PASSWORD
|
|
SMTP_AUTH_TYPE
|
|
EMAIL_FROM_ADDRESS: the sender's email address
|
|
EMAIL_FROM_NAME: the sender's name
|
|
```
|
|
|
|
In order to connect to a database, set the following environment
|
|
variables:
|
|
|
|
```
|
|
DB_TYPE
|
|
DB_HOST
|
|
DB_PORT
|
|
DB_DATABASE
|
|
DB_USERNAME
|
|
DB_PASSWORD
|
|
DB_TLS: the TLS option
|
|
```
|
|
|
|
For details on the values that these variables should be set to, see the
|
|
section for your desired database.
|
|
|
|
### Using binary file
|
|
|
|
Download the binary file from the release and run it with command:
|
|
|
|
```
|
|
./wireguard-ui
|
|
```
|
|
|
|
## Databases
|
|
|
|
By default, all the data for the application is stored in JSON files in
|
|
the `./db` directory. By using the `--db-type` command line option or by
|
|
setting the `DB_TYPE` environment variable, you can choose to use a
|
|
different backend. Note: for some backends, other options may need to be
|
|
set.
|
|
|
|
Backend options:
|
|
|
|
| Value | Database | Other options |
|
|
| ----- | -------- | ------------- |
|
|
| jsondb | JSON files in `./db` | None |
|
|
| mysql | MySQL or MariaDB server | `DB_HOST` `DB_PORT` `DB_DATABASE` `DB_USERNAME` `DB_PASSWORD` `DB_TLS` |
|
|
|
|
### JSONDB
|
|
|
|
When using the JSONDB database, all of the data is stored in separate
|
|
JSON files in the `./db` directory. This is the default database and no
|
|
special configuration is required.
|
|
|
|
### MySQL
|
|
|
|
In order to use a MySQL or MariaDB server, you will first have to set
|
|
the `DB_TYPE` environment variable to `mysql`. You should then specify
|
|
the hostname or IP address of the database server using `DB_HOST` as
|
|
well as the port on which the database server is listening, if it is
|
|
different from the default of `3306`. `DB_DATABASE` is the name of the
|
|
database that WireGuard-UI is to use. Please ensure that the database is
|
|
empty before you start WireGuard-UI for the first time otherwise the
|
|
tables will not be initialized properly. `DB_USERNAME` and `DB_PASSWORD`
|
|
should contain the login details for a user with the following
|
|
permissions for the database:
|
|
|
|
* SELECT
|
|
* INSERT
|
|
* UPDATE
|
|
* DELETE
|
|
* CREATE
|
|
* ALTER
|
|
|
|
`DB_TLS` sets the TLS configuration for the database connection. It
|
|
defaults to `false` and can be one of the following values:
|
|
|
|
| Option | Description |
|
|
| ------ | ----------- |
|
|
| false | Never use TLS (default) |
|
|
| true | Enable TLS / SSL encrypted connection to the server |
|
|
| prefered | Use TLS when advertised by the server |
|
|
| skip-verify | Use TLS, but don't check against a CA |
|
|
|
|
After you have set these options, you should be able to start the
|
|
WireGuard-UI server. The server will then initialize the database and
|
|
insert the default configuration. If this process is interrupted, you
|
|
will have to empty the database and restart the initialization.
|
|
## Auto restart WireGuard daemon
|
|
WireGuard-UI only takes care of configuration generation. You can use systemd to watch for the changes and restart the service. Following is an example:
|
|
|
|
### systemd
|
|
|
|
Create /etc/systemd/system/wgui.service
|
|
|
|
```
|
|
[Unit]
|
|
Description=Restart WireGuard
|
|
After=network.target
|
|
|
|
[Service]
|
|
Type=oneshot
|
|
ExecStart=/usr/bin/systemctl restart wg-quick@wg0.service
|
|
|
|
[Install]
|
|
RequiredBy=wgui.path
|
|
```
|
|
|
|
Create /etc/systemd/system/wgui.path
|
|
|
|
```
|
|
[Unit]
|
|
Description=Watch /etc/wireguard/wg0.conf for changes
|
|
|
|
[Path]
|
|
PathModified=/etc/wireguard/wg0.conf
|
|
|
|
[Install]
|
|
WantedBy=multi-user.target
|
|
```
|
|
|
|
Apply it
|
|
|
|
```
|
|
systemctl enable wgui.{path,service}
|
|
systemctl start wgui.{path,service}
|
|
```
|
|
|
|
### openrc
|
|
|
|
Create and `chmod +x` /usr/local/bin/wgui
|
|
```
|
|
#!/bin/sh
|
|
wg-quick down wg0
|
|
wg-quick up wg0
|
|
```
|
|
|
|
Create and `chmod +x` /etc/init.d/wgui
|
|
```
|
|
#!/sbin/openrc-run
|
|
|
|
command=/sbin/inotifyd
|
|
command_args="/usr/local/bin/wgui /etc/wireguard/wg0.conf:w"
|
|
pidfile=/run/${RC_SVCNAME}.pid
|
|
command_background=yes
|
|
```
|
|
|
|
Apply it
|
|
|
|
```
|
|
rc-service wgui start
|
|
rc-update add wgui default
|
|
```
|
|
|
|
## Build
|
|
|
|
### Build docker image
|
|
|
|
Go to the project root directory and run the following command:
|
|
|
|
```
|
|
docker build -t wireguard-ui .
|
|
```
|
|
|
|
### Build binary file
|
|
|
|
Prepare the assets directory
|
|
|
|
```
|
|
./prepare_assets.sh
|
|
```
|
|
|
|
Then you can embed resources by generating Go source code
|
|
|
|
```
|
|
rice embed-go
|
|
go build -o wireguard-ui
|
|
```
|
|
|
|
Or, append resources to executable as zip file
|
|
|
|
```
|
|
go build -o wireguard-ui
|
|
rice append --exec wireguard-ui
|
|
```
|
|
|
|
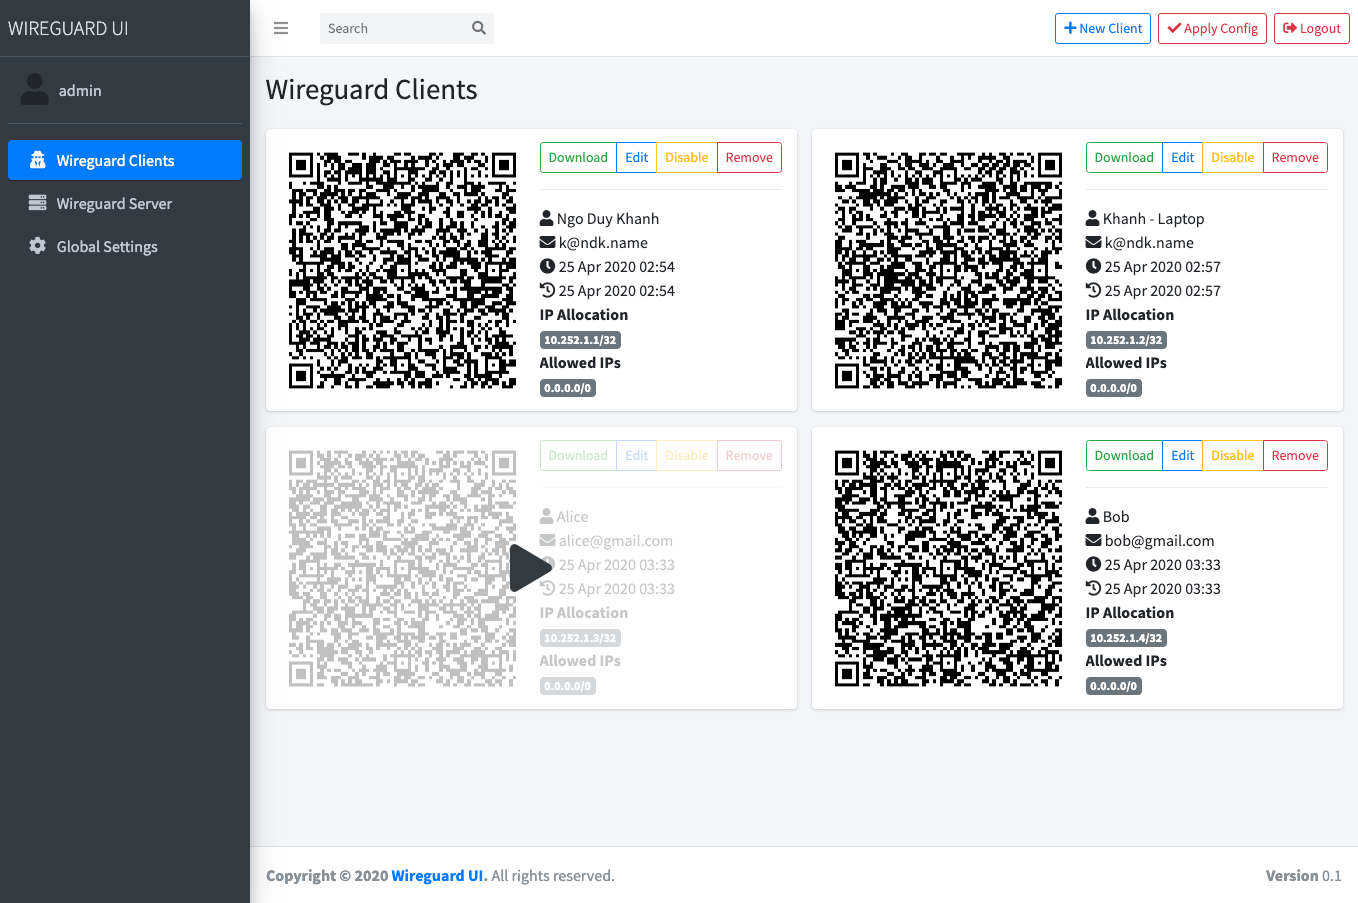
## Screenshot
|
|
|
|
|
|
|
|
## License
|
|
MIT. See [LICENSE](https://github.com/ngoduykhanh/wireguard-ui/blob/master/LICENSE).
|
|
|
|
## Support
|
|
If you like the project and want to support it, you can *buy me a coffee* ☕
|
|
|
|
<a href="https://www.buymeacoffee.com/khanhngo" target="_blank"><img src="https://cdn.buymeacoffee.com/buttons/default-orange.png" alt="Buy Me A Coffee" height="41" width="174"></a>
|